
How to scale a drawing using a grid
We can use a grid of the same size as our reference to practice drawing with more accuracy, but what if we want to create a drawing which is either larger or smaller than the reference? In this blog post, I’ll show you how.
If you prefer to digest this content in video format, you may enjoy this YouTube tutorial I created which is a real-time drawing using the grid technique:
STEP 1: MEASURE YOUR REFERENCE
We need to start by measuring our reference - this will allow us to decide on an appropriate size for our grid. You can use any size for your grid squares - as a general rule the simpler the reference, the bigger the grid squares, but if you have a more complex image with a lot of detail, use smaller grid squares.
Although technically you can use rectangular grids, I recommend sticking with equal sided squares - they are SO much easier to work with, and when you are scaling with uneven shapes like rectangles, even a tiny error in rounding a number in your grid can lead to the proportions being off when you start drawing, by which time it’s too late to correct - so my advice is to stick with squares.
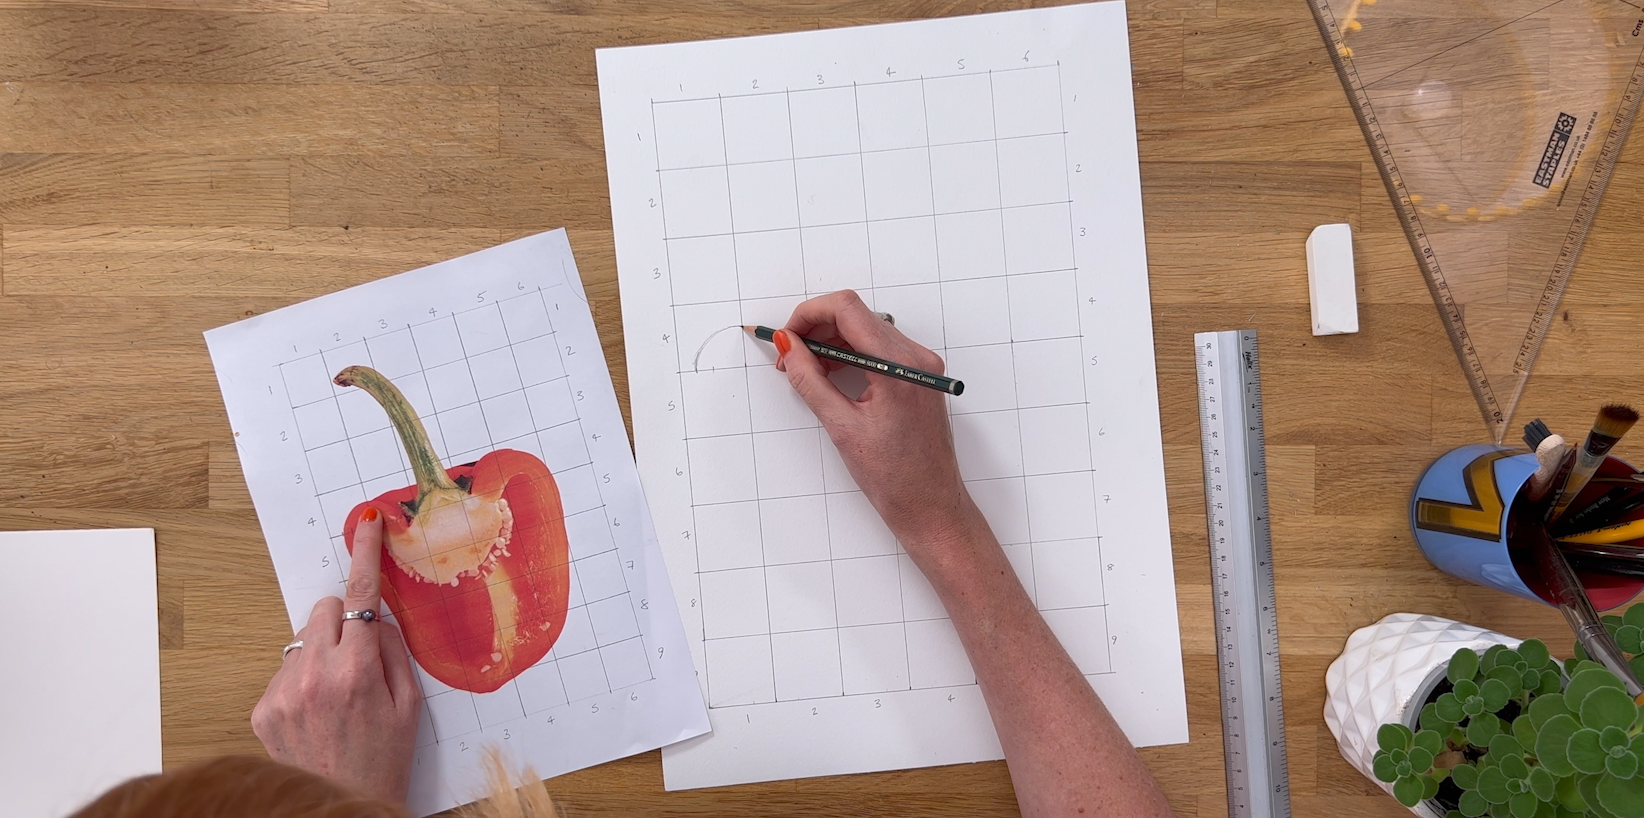
In this example of a pepper printed onto an A4 sized paper, I will use inches as my unit of measurement - it’s a relatively simple image, so inches seems appropriate, but if this was something more complex, or a trickier subject like a portrait, I’d use a smaller grid of half an inch.
When you measure your reference, allow a little space around your subject, and round to the nearest unit of measurement (the nearest inch in my case).
In my example, I’m going to draw a grid of 6 inches by 9 inches.

STEP 2: DRAW A GRID ON YOUR REFERENCE
Start by drawing one of the longest sides of your grid (the height in my case). This helps to make sure we get the grid in the right spot.
Put markers at each of your grid size intervals (every 1 inch in my case) as these will form the structure of our grid.
The most important thing when you are drawing out your grid is to get a good 90 degree angle to your corners - otherwise your grid will be skewed which can make your drawing look wonky later.

If you have a set square, you can use that to achieve an accurate 90 degree corner, but if you don’t have one, find a piece of pre-cut paper (as in paper straight from a pack or sketchbook you haven’t cut by hand) - you can use one corner of this to align with your corner to make sure you have that angle at 90 degrees.

Complete all 4 sides of your grid with markers at your grid square intervals, and then use those markers to join up the horizontal and vertical sides of your grid.
Once you have drawn the grid on your reference, I recommend numbering your grid squares horizontally and vertically - this helps us out for 2 reasons:
It helps when we are making our grid on the drawing paper - its easier than you might think to accidentally draw a grid of the wrong size!
It also helps when we are drawing, because we can use these numbers to more quickly and easily locate which grid square we are working in.

STEP 3: MEASURE YOUR DRAWING PAPER
Next, we need to measure the drawing paper so that we can use this measurement to help us determine the proportional scale of the grid - as in how much larger or smaller is the drawing going to be compared with the original reference.
STEP 4: CALCULATE THE SIZE OF YOUR DRAWING GRID
This is without doubt the trickiest part of the process if (like me!) maths is not your strong suit, but there are some simple formulas we can follow to work out the size of our drawing grid.
Essentially, you take the height of your drawing paper, divide it by the number of grid squares you want to have (9 in our case) and this will give you the maximum grid height.
Do the same for the width.
Be aware that you will probably end up with 2 completely different figures here for the horizontal and vertical, so what we need to do is either round down to an easier to digest number or you can take the smaller of the 2 numbers and use that for your grid square size.
Either way, we know this grid will definitely fit onto our paper.
Using the smaller of the 2 numbers you just calculated as your grid size will mean that your grid will fill the entire width (or height depending on which figure was the smallest).
If you want to have a little more space around your drawing, or you want a number which is a little easier to work with then you can round that number down - in my example, the height calculation gave me a grid size of 1.61 inches, and the width calculation gave me a grid size of 1.92 inches. So this means I could use grid squares of 1.61 inches square - but honestly I don’t really want to work with such a fiddly number so I will round down to 1.5 inches and use that for my grid.

STEP 5: DRAWING THE GRID ON THE DRAWING PAPER
Now we know the size of our drawing grid, we can draw this onto our drawing paper, using exactly the same process as we did when we drew the grid on the reference.
Don’t forget to pay particular attention to getting those corners at a good 90 degree angle, and also number your grid squares once you have drawn your grid to make sure you have the same number of grid squares wide and high as your initial grid.

When we work with a grid for drawing, remember that your grid can be any size, so long as it has the same number of grid squares in height and width as the original.
For example all these grids have the same proportions of 5 squares wide by 7 grid squares high, so any of them would work for this reference grid:

This is the key thing about proportion - it is about size relationships, not just size.
STEP 6: START DRAWING
It does not matter where you begin, but I quite like to start somewhere near the left side just because I’m right handed and so I’ll avoid smudging my drawing if I start left and work towards the right, but feel free to begin anywhere.
Begin in one grid square, and transfer what you can see from your reference into this grid square, paying particular attention to the placement of where any lines cross your grid lines.
Keep your pencil lines light so you can refine them later.
TIP: You can divide your grid squares in half or in quarters to help you more closely pinpoint where exactly parts of the reference hit the grid.
Once you have transferred the drawing from the first grid square, move onto the next one, and keep going until you have transferred all of the reference to your drawing.
STEP 7: REFINING THE DRAWING
You may find that as you complete more of the drawing, it feels a little bit sketchy, or disjointed when you work one grid square at a time. Once you have plotted in where the main shapes and lines of the drawing are located, use more fluid, confident lines to go over your drawing and make it feel more refined.
STEP 8: ADDING DETAILS
As you begin to complete more of the drawing, and refine the parts you have plotted in, you may find that you want to add in more details and embellishments ‘freehand’ in a more natural way without copying every detail from the grid reference - this is a great way to use a grid to get the main shapes and proportions drawn in accurately, yet keep your own style in adding the little details.
EXAMPLE: HOW THIS WORKS IN THE CASE OF DESIGNING A MURAL
If you are using a grid to design a mural, then the process has an additional step in that we will need to know the size of the final mural first because you are usually designing for a very specific location and size.
You will need to be accurate with your measurements for the purpose of designing a mural, particularly if the design is going all the way to the edge.
In following the above process, your ‘reference’ is the size of the finished mural (such as the wall) - and you can scale this down to a size you feel more comfy designing at.
Example: If I had a wall which was I was designing a mural for and it was 5 metres wide by 3 metres high, I would start with a grid which is, say, half a metre (50cm), so my grid would be 10 squares wide by 6 squares high.
Let’s say I like to draw and design at roughly A4 size, which is 29.7 x 21 cm, this would mean by using the above grid calculations, my grid squares could be 29.7cm/10 grid squares = 2.97cm or 21cm/6 grid squares = 3.5cm.
This means I could draw a grid on that paper which is made up from 2.97cm grid squares (which would fill the width of the paper) or I could round down to an easier to use figure of something like 2.5cm for my grid squares.
I can then use this smaller grid to create some designs, and then this small grid then becomes the reference, and I can transfer the design to the wall.
I created this mural for Paper Dress Vintage using this exact process:
Using a grid in drawing has so many benefits - both for those who are just learning how to work with accurate proportions, more experienced artists who are designing for site specific spaces, or those who just want to improve the accuracy and proportion in their drawings.
If drawing with grids and other ways to draw with accurate proportions interests you, then check out my online course Learn To Draw (From Life!) : 3 Approaches To Measuring + Proportion